
JavaScript is the most expensive resource to load on the website and the number one cause of poor load performance. Instead of shipping all the JavaScript as one large bundle in the initial application load, splitting the code into multiple chunks can significantly improve performance and provide a much better user experience.
This article explains code splitting in Vue and shows typical code patterns to use in order to optimize your Vue.js application's load time.
Why Split Your Code?
Less code requires less time to download and to parse. To reduce the initial JavaScript payload and boost the important performance metrics (like Time-To-Interactive), the main code bundle should only contain critical dependencies and initial view. Ideally, we should bring the initial resources load size closer to <170kB gzipped/minified and enable lazy-loading (loading app parts on-demand).
Reduced main bundle and lazy-loading implies that the code is divided into multiple chunks that can be loaded separately. Code splitting allows us just that - to separate application code into multiple bundles at build time. These code bundles can be asynchronously loaded when needed, as the user navigates the app.
A Quick Introduction to webpack
webpack is a tool used to optimize the app build process. One of its core functions is module bundling – it takes all modules with dependencies and bundles them into optimal, browser-ready code. Tools such as Vue CLI use webpack to bundle applications and create lazy-loaded bundles out of the box, with the help of default webpack configuration.
How does webpack support code splitting? webpack builds module dependency graph, with dependency statements marking entry points - and creates one code bundle per entry point. If there is a single entry point in your Vue app, webpack will create a single bundle comprised of the entire application code. The goal of code splitting is to let webpack create smaller separate bundles with separate entry points (essentially code-splitting points) on the dependency graph.
Code splitting is achieved by using dependency statements like import and require. When webpack comes across this syntax, it automatically starts code splitting your app by moving the imported modules into a separate bundle.
Vue Code Splitting Syntax
The static import statement will always make the imported module evaluated at load time. To make the module load asynchronously, all we need to do is change the static import statement (forcing the code to download upfront) into a function that returns a dynamic import statement:
// Statically loaded
import Article from './components/Article.vue'

// Asynchronously loaded
const Article = () => import('./components/Article.vue')
Dynamic import indicates to webpack that a particular part of your application code (in this case Article.js and its dependencies) should be made a separate bundle. import() will return a Promise, which resolves to a module with a default export containing a Vue component.
There is a more advanced Async Component Factory syntax with options:
const AsyncComponent = () => ({
  component: () => import('./components/Article.vue'),
  // A component to use while the async component is loading
  loading: Loader,
  // A component to use if the load fails
  error: Error,
  // Delay before showing the loader. Default: 200ms.
  delay: 300,
  // The error component will be displayed if a timeout is
  // provided and exceeded. Default: Infinity.
  timeout: 4000
})
We can asynchronously load a bundle based on a runtime condition with the help of string interpolation:
// We can use a prop or a data value
const Article = () => import(`./components/${this.topic}-article.vue`)
Update: Vue 3 Code Splitting Syntax
Vue 3 requires async components definitions to be wrapped in a defineAsyncComponent method.
Also, note that some options in the async component factory have been renamed and some new options (suspensible and onError) have been added.
import { defineAsyncComponent } from 'vue'

// Import without options
const Article = defineAsyncComponent(() => import('./components/Article.vue'))

// Async component factory
const AsyncComponent = defineAsyncComponent({
  loader: () => import('./components/Article.vue'),
  loadingComponent: Loader,
  errorComponent: Error,
  delay: 300,
  timeout: 4000,
  suspensible: false,
  onError(error, retry, fail, attempts) {
    if (error.message.match(/fetch/) && attempts <= 2) {
      retry()
    } else {
      fail()
    }
  }
})
Suspense
Suspense is a special Vue 3 component that checks if the async component has been loaded and displays fallback content until the async operation is resolved. The default slot will be displayed when the asynchronously loaded content is ready. The fallback slot content will be shown instead of the default slot content until it is fully loaded.
<template>
  <Suspense>
    <template #default>
      <article />
    </template>
    <template #fallback>
      <div>Loading...</div>
    </template>
  </Suspense>
</template>
The suspensible property of the async component is by default set to true. This means that even if the async component has defined the fallback content with properties like loadingComponent, the <Suspense> component fallback content will take precedence.
Vue Code Splitting Strategies
When it comes to code splitting, the most important question we need to ask ourselves is where to split? In a typical Vue app, determining split points is easy and almost intuitive. Vue code splitting can be done:
- at the route level
- at the component level
Code Splitting by Routes
We can code split every single route to ensure we delivered the code relevant to that route. Code splitting by routes should always be done for all routes except the initial view.
The code for converting the route from statically loaded to asynchronously with an import statement:
const About = () => import('./components/About.vue')
const User = () => import('./components/User.vue')

const router = new VueRouter({
  routes: [
    { path: '/about', component: About },
    { path: '/user:id', component: User }
  ]
})
Code Splitting by Vue Components
webpack allows us to write Single-File Components, which results in cleaner, modular code. More important, anything wrapped in a Single-File Component can easily be code split. We simply need to identify the components that are runtime determined or need to be conditionally rendered (like tooltips, modals, or anything below the fold) to asynchronously load them on-demand:
const ChatWindow = () => import('./components/ChatWindow.vue')

export default {
  components: {
    ChatWindow
  }
}
Vue Code Splitting Patterns
Lazy-loading with v-if
In Vue we can lazy-load components by combining dynamic import and the v-if directive.
v-if compiles down to a render function. If the state passed to v-if is false, the component will never be required and loaded. Only when this state evaluates to true at runtime (e.g., if changed by some event) Vue will call the function, requiring the lazy-loaded component and request it to render.
<template>
  <div v-if="render">
    <conditional-component></conditional-component>
  </div>
</template>

<script>
  // Component will not be required and loaded until render === true
  const conditionalComponent = () => import ('./components/conditionalComponent.vue')

  export default {
    components: {
      conditionalComponent
    },
    data() {
      return: {
        render: false
      }
    }
  }
</script>
Dynamic Components with Dynamic Imports
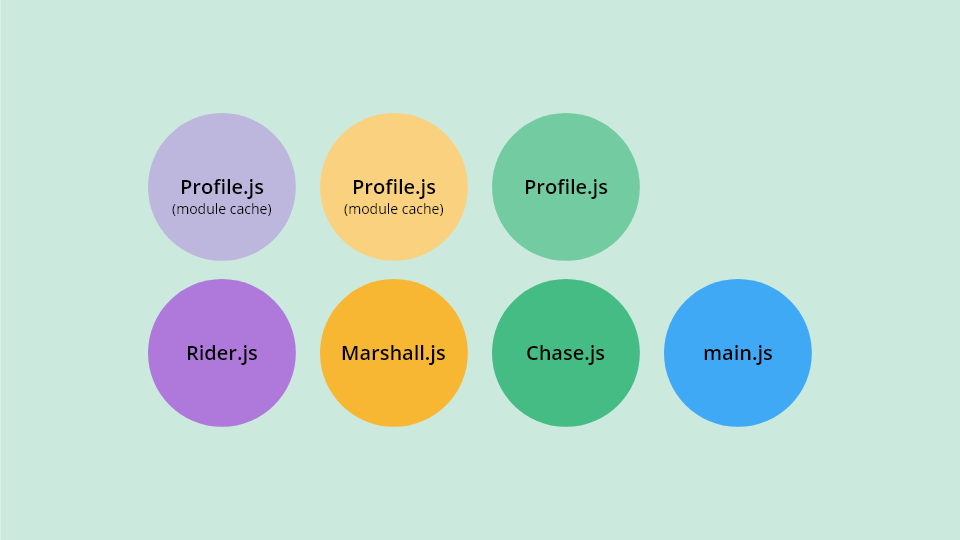
We can use the computed property and dynamic import to dynamically switch between components in the component placeholder and load the components on-demand.
For this approach to work, the computed property must return a function, which in return will import a component dynamically. Hence, the computed property will dynamically load the component as a module, depending on the user data value.
<template>
  <component :is="userProfile"></component>
</template>

<script>
  export default {
    data() {
      return {
        user: 'Chase'
      }
    },
    computed: {
      userProfile() {
        // We must explicitly use this.user inside the computed property for this to work
        const user = this.user
        return () => import(`./components/${user}.vue`)
      }
    },
    methods: {
      getUserName() {
        // import() returns a Promise - we can consume it
        this.userProfile().then(user => console.log(user))
      }
    }
  }
 </script>
We built a mini Vue 2 app with an example of code splitting based on the dynamic imports with dynamic components:
- Full example code on GitHub ›
Prefetch and Magic Comments
By default, Vue CLI 3 prefetches all bundles in the browser's idle time once the main bundle is loaded. In case we need to prefetch only particular components, we can instruct webpack to do so with magic comments added inside the import() function:
/* vue.config.js */
module.exports = {
  // Delete the prefetch plugin
  chainWebpack: config => {
    config.plugins.delete('prefetch')
  }
}

/* App.vue */
// Prefetch only Article component
const Article = () => import(/* webpackPrefetch: true */ './components/Article.vue')
This will result in article.js being appended to the head of the page.
With the help of magic comments, we can also create a name for a chunk (instead of default names 0.js, 1.js, etc.):
const Article = () => import(/* webpackChunkName: "Article" */ './components/Article.vue')

// Or use 'request' placeholder for a variable
const Article = () => import(/* webpackChunkName: "[request]" */ `./components/${this.topic}-article.vue`)
Full list of webpack magic comments can be found on the official website.
How to Analyze the Application
To identify the code used for a particular view, you can analyze the code coverage with the Coverage tab in Chrome Dev Tools:
- open DevTools
- press Ctrl + Shift + P
- type "coverage"
- press Drawer: Coverage
- reload and analyze the unused code
If there is a substantial amount of unused code, you can move it to a separate bundle and lazy load with the dynamic import statement.
Once the code splitting is finished, we can further analyze bundle size with some of the available visual tools, like the Vue CLI built-in analyzer. It can be accessed by entering the project's folder in the terminal and typing vue ui.
Other Popular Options Are:
- official webpack analyze tool - webpack stats for your app,
- webpack-bundle-analyzer - a plugin that provides interactive treemap bundles visualization,

- webpack-visualizer - shows how much space modules take up and possible duplicates.